Basic Router Table
My first router is a cheap £20 "craft" branded router from the cheapo shop "Aldi". I'd never even used a router till I bought this one. I thought it was cheap enough to use for a few basic edge profiles and decide if I liked routing. Well, a year later, i'm still using it.
After using it a few times I found that I often clamped the router upside down in my workmate. This was far from ideal as my workmate didn't really open wide enough to hold the router securely. Even so, I still found this arrangement better than using the router the right way up.
Warning, this was very dangerous, the router moved all over the place, and I had to keep one hand on the power button and use the other to hold the workpiece and router at the same time. Please dont' try it.
Recently Argos had they "Challenge" branded cheap router on sale for just £10. I thought this would be a good oportunity to try a table mounted router.
(It's on offer again )
When I got the router, I realised the first problem, the switch was a push button one which had no easy way for me to leave it "locked" on.
After some consideration, I decided to use my old Aldi router mounted in the table instead of the new Argos one.
I first removed the original router base plate and found it was about 3mm thck. I had some 6mm MDF in the garage so cut a piece about 400x800mm for my table top. I didn't want to go too thick as i'd loose too much depth of cut on my router bits.
I then put a batten 20x40 approx round the edge of this to give it some strength. I screwed through the table top into the batten and countersunk the screws using my handy cheap "lidl" self countersinking bits in my cheap "homebase" bench drill. (Did you notice how much I like cheap tools :) I also screwed across the butt joint corners to give it a bit more strength.
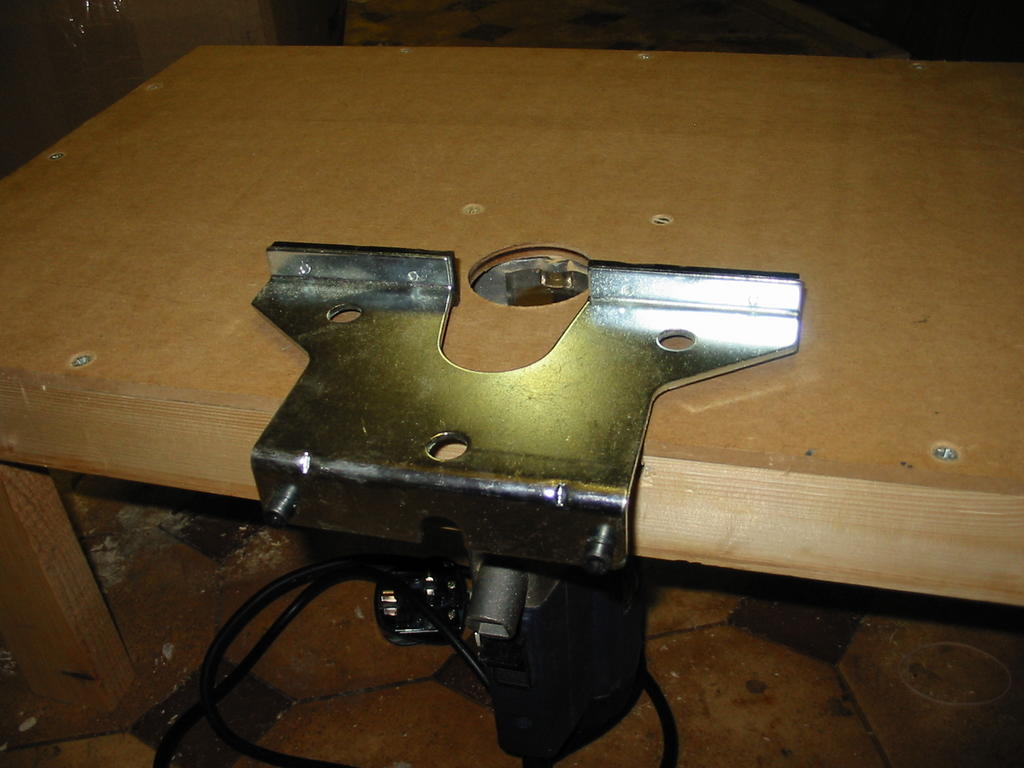
Next, I used the original router base plate as a template to mark out the mounting holes and the main hole for the router bits. After drilling and countersinking these, I cut the main hole, using a hole saw of approximately the same size as the hole in the original base plate (45mm if I remember correctly).I bolted on the router with some longer replacement countersink head bolts (machine screws).
I then attached the router and measured up for the legs.
I cut 4 legs, screwed and glued them on the inside of the batten and left it to dry.
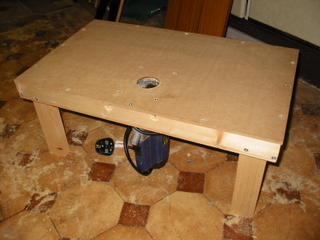
Here is the final result
After trying it out I found a couple of problems. Firstly, the router was mounted too near the edge of the table, the router handle caught on the batten edge of the table. So I routed a notch in this to allow the router to plunge to full depth. (Note to self: measure at least once next time)
Also, I needed a fence, You may notice that there are a couple of holes in the batten where the router is. By sheer luck, I had mounted the router this way and could use the original router fence in the table. See below.

Thanks to all the guys and girls from uk.d-i-y for helping me with this.
After using it a few times I found that I often clamped the router upside down in my workmate. This was far from ideal as my workmate didn't really open wide enough to hold the router securely. Even so, I still found this arrangement better than using the router the right way up.
Warning, this was very dangerous, the router moved all over the place, and I had to keep one hand on the power button and use the other to hold the workpiece and router at the same time. Please dont' try it.
Recently Argos had they "Challenge" branded cheap router on sale for just £10. I thought this would be a good oportunity to try a table mounted router.
(It's on offer again )
When I got the router, I realised the first problem, the switch was a push button one which had no easy way for me to leave it "locked" on.
After some consideration, I decided to use my old Aldi router mounted in the table instead of the new Argos one.
I first removed the original router base plate and found it was about 3mm thck. I had some 6mm MDF in the garage so cut a piece about 400x800mm for my table top. I didn't want to go too thick as i'd loose too much depth of cut on my router bits.
I then put a batten 20x40 approx round the edge of this to give it some strength. I screwed through the table top into the batten and countersunk the screws using my handy cheap "lidl" self countersinking bits in my cheap "homebase" bench drill. (Did you notice how much I like cheap tools :) I also screwed across the butt joint corners to give it a bit more strength.
Next, I used the original router base plate as a template to mark out the mounting holes and the main hole for the router bits. After drilling and countersinking these, I cut the main hole, using a hole saw of approximately the same size as the hole in the original base plate (45mm if I remember correctly).I bolted on the router with some longer replacement countersink head bolts (machine screws).
I then attached the router and measured up for the legs.
I cut 4 legs, screwed and glued them on the inside of the batten and left it to dry.

Here is the final result
After trying it out I found a couple of problems. Firstly, the router was mounted too near the edge of the table, the router handle caught on the batten edge of the table. So I routed a notch in this to allow the router to plunge to full depth. (Note to self: measure at least once next time)
Also, I needed a fence, You may notice that there are a couple of holes in the batten where the router is. By sheer luck, I had mounted the router this way and could use the original router fence in the table. See below.
Thanks to all the guys and girls from uk.d-i-y for helping me with this.
posted by J at 9:00 pm
13 comments
![]()
